Happy Thursday, Craft Friends!
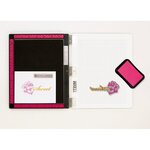
Today is Scrapbook.com's Live Stream (HERE) featuring the new Plush and Velvet Albums!
As a mom of two boys, in the midst of adolescence, I tend to forgo soft, plush material. While my creative space is my little oasis in the midst of boyhood, my boys are always welcome in my space which means the occasional dirty handprints, a smudge of cheese curlers there, and well a smelly sock or two. This means I tend to keep soft, plush fabric to a minimum. However, the new Limited Edition Plush and Velvet Albums from Scrapbook.com just might change my mind. I had a chance to play with these pretty albums and create a coordinating 9x12 layout of my youngest son. The quality of the album is the same great quality as my previous Scrapbook.com albums, but with added luxury. The 9x12 D-ring album can hold approximately 40 pages, has the Scrapbook.com logo embossed on the back inside cover, reinforced corners, and a metal label holder on the spine. My scrapbook pages fit nicely in the binder without any overhang. And the new album additional looks rather lovely sitting on the shelving in my creative space.
Monday, March 28, 2022
Pinkfresh Studio March Release Blog Hop| Washi, Stamp, Die, Stencil and Hot Foil Stamp
Hello, Sweet Friends!!
Welcome to Pinkfresh Studio's March Release! Over the course of the past week, little sneak peeks have been popping up on Instagram and now the big day is here. There is so much to love whether you love beautiful floral washi tape designs or geometric dies, there is something for everyone to enjoy with this release. You know where my creative heart gravitates toward...geometric shapes. Let's go!
My first card features the AMAZING Hibiscus collection paired with the Nested Diamonds Hot Foil Stamp. I warned you the geometric shapes would be fantastic. To create this card, I started by adhering the hibiscus washi tape to a 4.25x5.5 piece of white cardstock and then diecutting this using the coordinating dies. The Nested Diamonds dies were used to create a focal point on the righthand side of an A2 card panel. I then inked this area using various shades of orange. To create the gold matte diamond borders, I used the coordinating Nested Diamond Hot Foil stamp and the dies to die cut my pieces. Once I had my pieces, it was time to assemble my card. I added a sentiment and gold inky splatters to the card front and nestled the hibiscus bouquet among the diamond-shaped cutouts. A Copic-colored butterfly in shades of orange and purple completes this card.
My second card pairs together the Fuschia collection and Nested Hexagon dies.
I enjoy finding new ways to use my dies, and this card is no exception. Using shape dies to create an interesting background for the hanging fuchsia florals is a great way to utilize a craft room staple. I diecut the A2 panel once I had created my geometric background with the dies. I wanted to add a little visual interest before layering the top panel with fuchsia flowers, so I stamped the largest image from the set onto another A2 panel. I then used foam tape adhesive to add the top panel. Once adhered the top panel, I arranged the floral pieces among the hexagon cutouts. A simple sentiment, Copic-colored butterfly, and matte gold pearls complete this card.
Thank you for spending time with me. I hope these cards have inspired you to use geometric dies in new and unexpected ways. Hop along with the Pinkfresh Studio Creative Team and guest designers for more inspiration.
And as with every release, Pinkfresh Studio is looking to share the love. Pinkfresh Studio will gift one lucky creative with the ENTIRE March release. Individuals will be chosen from Pinkfresh Studio's Blog (HERE) and YouTube Page (HERE). In addition, ten (10) creatives will have a chance to win a $25 gift card to Pinkfresh Studio's online store. To be eligible, leave a comment along the Blog Hop for a chance to win. Winners will be chosen from the comments and posted on Pinkfresh Studio's Winners Page (HERE) on April 5th.
You are invited to the Inlinkz link party!
Click here to enterHello, Crafty Friends!
Friday is here! And you know what that means...a chance to get crafty this weekend! I enjoy waking up on a Saturday morning and just stepping into my creative space for a chance to play with my supplies, organizing does count 😁, trying out a new technique, or just taking a moment to soak it all in a quiet and creative space.
This week, I thought I would try my hand at playing with Scrapbook.com's new Brooklyn Upper Case Alphabet stamp set paired with the Slimline Strips.
Usually, I do not design cards with an alphabet stamp set. I feel comfortable using alphabet dies, but I wanted to create outside my comfort zone. I started myself out in this new endeavor by creating a background with a sentiment on top. Simple, I know, but still a step in a new direction. I stamped each uppercase letter in Pinkfresh Studio's Rocky Slope dye ink. Once this was complete, I diecut the sentiment "Hello You" from white cardstock and the Boho cardstock pack, a favorite color palette of mine. I like to add dimension to my letters, so I diecut each of the letters three times. I wanted to create some visual interest, the top layer for each letter uses the strips from the new Slimline Strips die. The "You" from the Thinking of You die set completes this fun, graphic card.
I hope this card has inspired you to step into your creative space and think of new ways to use alphabet stamps in your card/layout designs.
Create something beautiful...
Keia
Card Supplies:
Hello, sweet friends.
Today, I am sharing with you a card featuring Pinkfresh Studio's Sunflowers Collection. The Sunflower is the official flower of Ukraine and is a symbol of peace. In solidarity with the people of Ukraine, Pinkfresh Studio will donate 100% of the sales from this collection to Save the Children. #StandWithUkraine
To create this card, I used the Butterfly collection hot foil stamp on Spellbinders' Glimmer cardstock and acetate sheets. If you have not tried this paper for your foiling needs, I highly recommend it. I achieve a crisp foiled image when using these specialty papers for foiling. Once I had my foiled images, I used my Copic markers to color the cardstock butterfly image using hues of blue and yellow. The effect, once layered with the acetate butterfly image looks like a stained glass piece. For some time, I have seen the butterfly with florals image and wanted to recreate this look using the sunflower washi tape. It took a bit of patience, but I love how the focal piece came together. And layering the sunflower washi tape images using foam adhesive provides wonderful dimension. The simple inked background, in shades of blue, features gold watercolor splatters and a lovely sentiment from the Always Uplifting stamp set. A few gold matte metallic pearls and falling leaves complete this card.
Thank you for visiting this post. For more information and inspiration using the Pinkfresh Studio Sunflower Collection, please visit the online store (HERE). And remember, 100% of the proceeds from this collection will go to Save the Children. Thank you in advance for your support.
Create Beauty Every day,
Keia
Sunflower Collection

.JPG)
.JPG)
.JPG)
.JPG)








.JPG)

.JPG)
.jpg)


.JPG)


Social Icons