Thursday, December 30, 2021

Pinkfresh Studio| A little note to say...Thank You

 Hello, Crafty Friends!


I hope you are having an amazing holiday season. This year is quickly drawing to a close; however, there is always time to create. I managed to sneak in a little crafty time between the Christmas movies, gift wrapping paper, and yes, birthday gifts (my eldest is a December baby).  Up next, thank you cards...


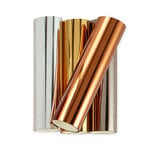
Okay, it only took a few months, but I think I am beginning to get the hang of this hot foil stamping thing. I will not lie, hot foil stamping had me creative stumped. But after tears of frustration, YouTube videos, and reaching out to my creative peeps, I am feeling a little more sure-footed. Hot foil stamping is really ALL ABOUT THE PAPER. I have found that 110lb cardstock along with a paper shim (110lb folded in half) works best for my foiling system. Finally, I am able to achieve the correct amount of pressure with my foiling system. YES!!!!!! 


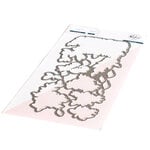
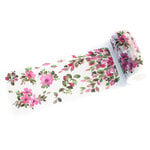
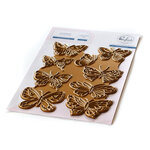
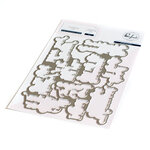
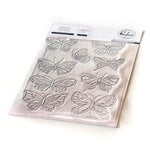
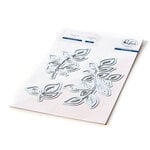
To create this card, I started by foiling two A2 panels using the new Heart Grid hot foil stamp and Gunmetal foil. I then cut these panels, using my trimmer, to create two foiled triangles. I layered these onto another white A2 card base. However, before adhering the triangles, I positioned them on the card base and stamped my sentiment. Once I stamped the sentiment, I adhered the triangles using foam adhesive. Next, I layered the beautiful washi tape florals and added, dare I write, I foiled butterfly. I was on a foiling roll. 😁 A few leaves blowing in the wind complete this card. 


Thank you for spending a portion of your day with me! Sending love, light, and creative vibes your way!


Keia 


Card Supplies


Tuesday, December 14, 2021

Pinkfresh Studio Instagram Hop| December Release Stamp, Die, Stencil and Hot Foil

 Hello, Crafty Friends!


Welcome back for another day of fun and inspiration. I hope you enjoyed yesterday's Blog Hop because the Pinkfresh Studio Creative Team and fellow guest designers are here to invite you to our Instagram Hop for more giveaways, inspiration, and fun. Today's card features the new Cosmic Bunch collection paired with the Abstract Triangles hot foil stamp. 


I love bold colors paired with radiant metallics and this card's color palette is no exception. To create this card, I used Copic markers to color the stamped image and then centered the floral bouquet on top of a foiled Cornflower Blue A2 card panel. Using the rectangular die in the Folk Edge Rectangles set and the Blanket Stitched Rectangle dies, I created a decorative edge. A simple sentiment on heat-resistant acetate and metallic gold pearls complete this card. 


Thank you for spending time with me. For more creative inspiration and a chance to win one of 10 $25 gift cards from Pinkfresh Studio, join us for the Instagram Hop (HERE). 


Happy Hopping!


Monday, December 13, 2021

Pinkfresh Studio December Release| Stamp, Die, Stencil and Hot Foil

Good morning, Pinkfresh Studio Friends!


Pinkfresh Studio's December Release| Stamp, Die, Stencil, and Hot Foil is now available! We are so excited to have you join the Pinkfresh Studio Blog Hop. Prepare to be inspired, have a chance to win amazing prizes, and be a part of a wonderful, creative community. Today's card features the new Built on Dreams paired with the Thrill of Hope Wreath layering stencils. 


The Built on Dreams collection is a versatile stamp and die collection that allows you to create cards centered around the beauty and meaning of home. The sentiments include "Welcome to the neighborhood" to "Bless this home with love and laughter" and everything in between. Since we are knee-deep into the holiday season, I chose a design that compliments the "Home for the Holidays" sentiment. To create this card, I cut two A2 panels from white cardstock and used the Thrill of Hope stencil set to create a colorful wreath on each panel using a traditional Christmas color palette. I used the Built on Dreams die to cut out the house shape. I added an acetate sheet to the die-cut panel and adhered foam tape to the back. I add a sentiment to the bottom of the other wreath panel and a sprinkling of iridescent flakes. I adhered the window panel to the matching A2 card panel and attached a gold heat-embossed sentiment along with a layered wreath to center the "home" sentiment.  I love how this card came together. 


Thank you for joining me; however, the fun is not over! As with each release, Pinkfresh Studio loves to share the love. Continue along the hop for a chance to win 1 of 10 $25 gift certificates. Leave a comment on the blogs along the way for a chance to win. The lucky winners will be announced on December 21st. You can find the winners on the GIVEAWAY Page (HERE). Good Luck and Happy Holidays!


You are invited to the Inlinkz link party!

Click here to enter

Monday, December 6, 2021

Pinkfresh Studio December Challenge| All Things Hoildays

 Happy December, Pinkfresh Studio Friends!


The holidays are upon us! I cannot believe we have 19 days until Christmas! So if you are like me, there are a few more Christmas cards to be made and sent to loved ones. This month's Pinkfresh Studio Challenge is all about the holidays...a perfect challenge to get us in the mood for a contemporary color palette, festive die, pattern paper, and a dash of inky splatters and sparkle. 


Okay, this color palette is right up my alley. If you are looking for a fresh take on a Christmas color palette, this one is for you. I love the use of the teal family and shades of red for a softer, elegant Christmas look. And like every crafter, it is fun to reimagine stamps and dies in new ways. For example, I am using the Joyful Peonies stamp and die for my card's Christmas floral, paired with the Blanket Stitched Oval as a stenciled background. I love shapes and how they add a new dimension to any card design. To create this simple oval mask, I cut a piece and copy paper to 4.25 x 5.5. I then die-cut the oval in the center of the panel and adhered it to a white A2 card base using repositionable tape. I inked the panel using Tidal Pool, Mermaid Cove, Aquamarine, and Ocean Breeze. Once inked, I peeled off the homemade mask and voila! The bouquet image was stamped using Detail Black ink and colored with Copic markers. I also, stamped the image again onto the inked panel using the lighter Rocky Slope dye ink as a shadow. A few white inky splatters for snow and a Christmas sentiment from the Perfect Sentiment: Holiday stamp set completes this card. 


Thank you for spending time with me. I hope this month's challenge inspires you to create something magical with the stamps, dies, and ephemera in your crafty stash. And as with each challenge, Pinkfresh Studio is looking to spread the love. Create a beautiful holiday card or project using the theme, color palette, or both for a chance to win a $50 gift card to Pinkfresh Studio's online store. Link your card HERE.


Happy Holidays,


Keia 


Tuesday, November 23, 2021

Pinkfresh Studio Instagram Hop| November Release

 Hello Friends!


I hope you enjoyed yesterday's blog hop! Today, I am sharing another card featuring the Blanket Stitched Rectangle set paired with the gorgeous Dahlia collection


I love creating cards with subtle details and geometric patterns. To create this card, I stamped a white panel in a muted color palette using the Nested Chevrons stamp. I then diecut the panel using the Blanket Stitched Rectangles. I love the subtle double-stitched edging that adds a perfect accent to any card/card base. I then stamped, stenciled, and diecut the Dahila floral cluster and used it as a lovely focal point. A foiled sentiment, using the Brushed Sentiments collection, and gold matte metallic pearls complete this card. 


Thank you for visiting. Interested in seeing more fabulous creations using goodies from the November release? Wonderful! Pinkfresh Studio is hosting an Instagram Hop on the social media platform (HERE) and several lucky creatives have a chance to win amazing prizes! One (1) lucky winner will win the entire release and 10 creative have a chance to win $25 gift cards to the Pinkfresh Studio online store! Wahoo! Head over now for your chance to win!


Happy Crafting,


Keia 


Monday, November 22, 2021

Pinkfresh Studio November Release| Essentials

Happy Monday, Pinkfresh Studio Friends!


Today, we are celebrating the November Essentials release. I love working with these amazing craft basics, which take crafting to the next level with stitched elements, folk designs, and more. 


My card features the new Folk Edge Squares set paired with Folk Garden 2 collection. To create this card, I started by using the Folk Edge Squares die to diecut two squares and interlaced the florals from the Folk Garden among the geometric shapes. To add a little interest, I inked a white background panel using Lavender dye ink. A simple sentiment and a few jewels completes this card. 


Thank you for visiting; however, the hop is not over. As with every new release, Pinkfresh Studio loves spreading handmade kindness. To celebrate the new release, Pinkfresh Studio is giving away the entire release to one lucky creative and ten (10) $25 gift cards to 10 crafty friends. To be eligible, leave a comment on each of the blogs along the hop. The lucky individuals will be announced on November 30th. The winners can be found on Pinkfresh Studio's Winners' Page (HERE).


Happy Crafting,


Keia 


You are invited to the Inlinkz link party!

Click here to enter

Monday, November 15, 2021

Pinkfresh Studio| Keep Going...

 Hello, sweet friends!


Happy Monday! My weekly calendar is already full, but I love squeezing in a moment of creative time. Today's card was a bit of a struggle. And I think it is okay to admit to ourselves when we are being creatively challenged and pushed outside our comfort zones. In the end, I created a lovely card that reflects my creative aesthetic but not without a few hiccups along the way. 


Originally, my card design used the Sweet Leaves Frame stencil. From the beginning, I was not happy with my design, but I continued to forge ahead thinking the finished product would be worth the effort. It was not. I had invested two hours into the card and threw it all in the trash. I took a day to clear my mind and then approached the card from a different design perspective. Instead, I decided to create a mosaic pattern using just the inside of the stencil. I used Tidal Pool and Ocean Breeze dye inks to create a tonal effect. The Small Butterflies collection (stamps, stencil, hot foil stamp, and dies), were the perfect additions to my card. A few gold inky splatters, gold metallic pearls, and a fitting sentiment from the new Daisy Slimline stamp completes this card. 


Remember, there are times creating can be a struggle. However, thankfully we have this community to cheer us on, draw inspiration from, and learn to grow as a creative. Until we meet again...I hope you have a chance to step into your space and make something beautiful.


Keep on creating...


Keia